
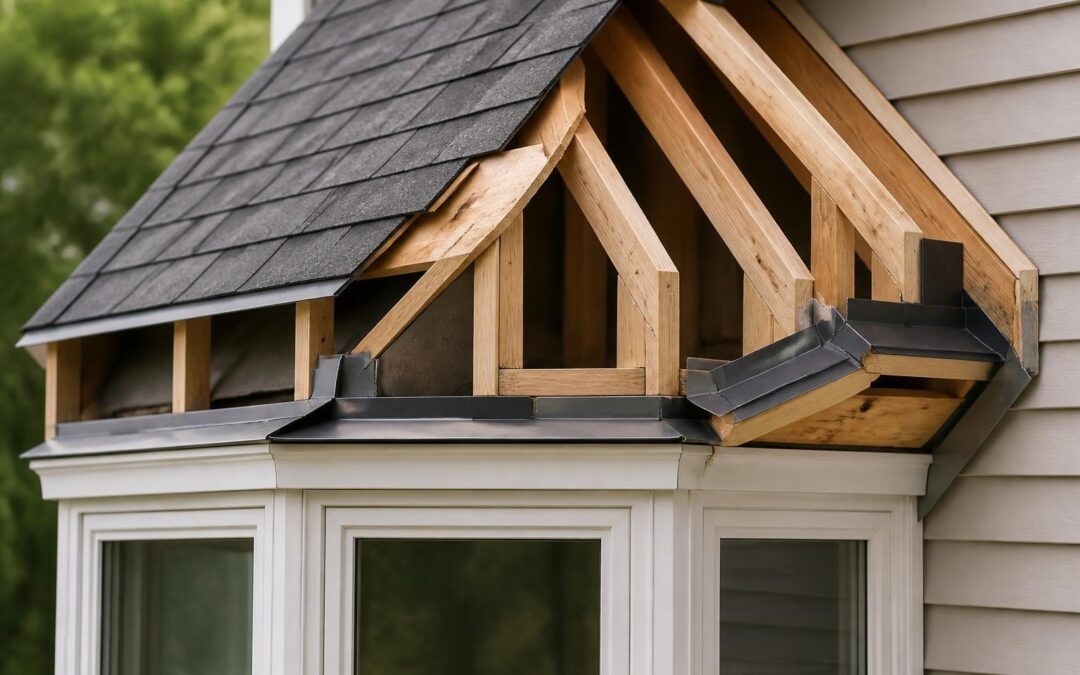
Bay windows add architectural charm and natural light to any home, but they also introduce unique roofing challenges that demand specialized knowledge and careful execution. Bay roofing requires meticulous attention to detail, proper flashing techniques, and an understanding of how these projecting structures interact with the main roof system. Whether you're planning a new installation or addressing existing problems, understanding the fundamentals of bay roofing will help you make informed decisions and ensure long-lasting protection for your home.
Understanding Bay Window Roof Structures
Bay roofing differs significantly from standard roofing applications due to the complex geometry and multiple transition points involved. A typical bay window projects outward from the main wall, creating a unique roofing challenge that combines elements of wall flashing, window integration, and traditional roof construction.
The fundamental structure of a bay roof consists of several key components working together. The roof deck typically sits atop a framework that extends from the bay's support brackets or corbels. This deck may be flat, gently sloped, or occasionally hipped, depending on architectural design and local building codes.
Primary Components of Bay Roofing Systems
Understanding each element ensures proper installation and maintenance:
- Structural framing that supports the roof deck and transfers loads to the building
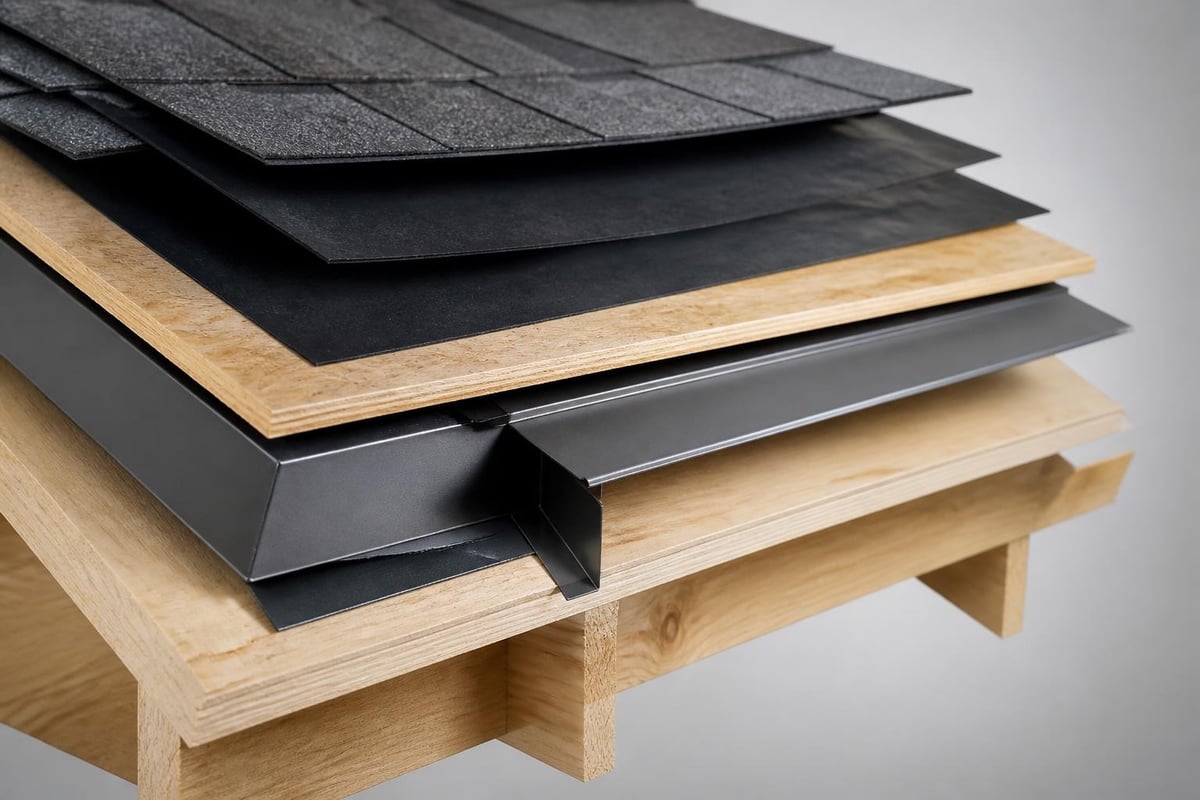
- Roof decking (usually plywood or OSB) that provides the substrate for roofing materials
- Underlayment layers that create the primary water barrier
- Flashing systems at all transition points between the bay roof and main structure
- Finish roofing material that matches or complements the main roof
- Trim and counter-flashing that integrates the bay roof with siding and windows
The complexity increases at the junction where the bay roof meets the main house wall. This critical transition zone requires multiple layers of protection and carefully sequenced installation to prevent water infiltration.
Material Selection for Bay Roofing Applications
Choosing appropriate materials for bay roofing depends on several factors including the slope, exposure, aesthetic requirements, and budget constraints. The material selection process differs somewhat from main roof applications due to the unique conditions bay roofs face.
Common Bay Roofing Materials
| Material Type | Best Applications | Typical Lifespan | Key Considerations |
|---|---|---|---|
| Asphalt Shingles | Sloped bay roofs 4:12 or steeper | 20-30 years | Cost-effective, matches main roof easily |
| Modified Bitumen | Low-slope or flat bay roofs | 15-20 years | Excellent waterproofing, requires proper drainage |
| EPDM Rubber | Flat or minimal-slope applications | 20-25 years | Durable, flexible, handles thermal movement |
| Metal Roofing | Various slopes, architectural designs | 40-60 years | Long-lasting, lightweight, premium appearance |
| Built-up Roofing | Flat or low-slope commercial bays | 15-25 years | Multiple layers, proven performance |
For sloped bay roofing installations, asphalt shingles remain the most popular choice among homeowners due to their versatility and cost-effectiveness. These materials integrate seamlessly with most residential roofing systems and offer reliable performance when properly installed with appropriate flashing details.
Low-slope and flat bay roofs present different material requirements. These applications demand membranes or systems specifically designed for minimal water runoff. Modified bitumen and EPDM membranes excel in these conditions, providing monolithic waterproofing that accommodates thermal expansion and contraction.
Climate considerations play a significant role in bay roofing material selection. In areas with heavy snow loads, materials must handle additional weight and potential ice damming at the transition to the main wall. In hot, sunny climates, UV resistance and thermal performance become primary concerns.
Critical Flashing Techniques for Bay Roofing
Flashing represents the most crucial aspect of bay roofing installation, as the majority of failures occur at transition points rather than within the field of the roofing material itself. Proper flashing creates a continuous weather barrier that directs water away from vulnerable areas.
The National Roofing Contractors Association (NRCA) provides comprehensive guidelines for flashing installations that apply specifically to complex conditions like bay roofing. These industry standards emphasize the importance of proper sequencing, overlap, and fastening patterns.
Step-by-Step Bay Roof Flashing Sequence
- Install the bay window according to manufacturer specifications, ensuring proper integration with the wall's water-resistive barrier
- Apply self-adhered membrane at the head of the bay window, extending onto the wall sheathing
- Install step flashing along the sides where the bay roof meets vertical walls
- Apply head wall flashing where the bay roof intersects the main building wall above
- Integrate counter-flashing over step flashing, properly embedded into wall cladding or siding
- Install apron flashing at the front of the bay where roof meets window head
- Apply final roofing materials working from bottom to top, maintaining proper overlaps
The head wall flashing where the bay roof meets the main structure deserves special attention. This location experiences significant water volume during rain events as runoff from the main roof cascades down the wall. Building Science Corporation’s guidance on window flashing provides valuable insights into creating robust water management at these critical junctions.
Self-adhered membranes have become the gold standard for bay roofing flashing applications. These products bond directly to substrates, creating a waterproof seal that accommodates minor movements and provides secondary protection if the primary roofing material fails.

Common Bay Roofing Problems and Solutions
Bay roofing systems face unique challenges that can lead to specific failure modes. Understanding these common problems helps homeowners identify issues early and implement effective solutions before minor concerns become major damage.
Frequent Bay Roofing Issues
Water infiltration at the head wall represents the most common bay roofing problem. This occurs when flashing fails to properly shed water away from the junction between the bay roof and main wall. Signs include interior staining on ceilings near the bay window, peeling paint, or visible water damage during heavy rain.
The solution requires careful examination of the flashing system. Inspectapedia’s guidance on wall leak repairs offers diagnostic approaches for identifying the specific failure point. Repairs typically involve removing finish materials to access the flashing, installing new self-adhered membranes, and properly integrating counter-flashing with the wall cladding.
Inadequate drainage on low-slope bay roofs creates standing water that accelerates material degradation. Bay roofs with slopes less than 2:12 require special attention to drainage design. Installing scuppers, increasing the slope during replacement, or switching to membrane systems designed for ponding water can resolve these issues.
Ice dam formation particularly affects bay roofing in cold climates. The transition between the conditioned space below the bay and the roof creates temperature differentials that promote ice damming. Solutions include:
- Improving insulation and air sealing below the bay roof deck
- Installing ice and water shield membranes across the entire bay roof
- Adding heat cable systems at vulnerable edges
- Ensuring adequate ventilation if the bay roof design allows
Flashing deterioration occurs naturally over time as sealants age, metal flashings corrode, or fasteners back out. Regular inspection and preventive maintenance extend bay roofing service life significantly. The Building America Solution Center’s flashing guidelines emphasize the importance of durable materials and proper installation from the start.
Installation Best Practices for Long-Term Performance
Professional bay roofing installation requires expertise that goes beyond standard roofing knowledge. The three-dimensional geometry, multiple material transitions, and critical flashing sequences demand careful planning and execution.
Pre-Installation Planning Considerations
Before beginning any bay roofing project, thorough assessment and planning prevent costly mistakes:
- Evaluate the structural condition of the bay window support system and framing
- Determine the optimal roof slope based on material selection and drainage requirements
- Plan material transitions to ensure compatibility between bay roof and main roof systems
- Identify ventilation requirements if the bay roof assembly includes an attic space
- Review local building codes for specific requirements regarding bay window construction
Substrate preparation forms the foundation of successful bay roofing. The roof deck must be solid, properly fastened, and free from defects. Any damaged sheathing requires replacement before proceeding with underlayment and roofing materials.
Timing and weather conditions significantly impact installation quality. Bay roofing projects should occur during dry weather with moderate temperatures. Self-adhered membranes require specific temperature ranges for proper adhesion, and wet substrates compromise the integrity of the entire system.
Professional contractors approach bay roofing installation with attention to detail that extends beyond the visible components. When investing in your home, working with experienced professionals ensures that your project receives the quality installation it deserves.
Quality Control Checkpoints
| Installation Phase | Critical Checks | Common Errors to Avoid |
|---|---|---|
| Deck Preparation | Flatness, fastening, gaps | Installing over damaged substrate |
| Underlayment | Coverage, laps, penetrations | Inadequate overlap at seams |
| Flashing | Sequence, integration, sealing | Reversing shingle direction |
| Finish Material | Alignment, fastening, exposure | Inadequate fastener placement |
| Final Details | Trim, caulking, cleanup | Missing counter-flashing |
The Building Science Insight on punched openings discusses the principles of proper window-to-wall integration that directly apply to bay roofing installations. Understanding these building science fundamentals separates lasting installations from those that fail prematurely.
Maintenance and Inspection Protocols
Regular maintenance extends bay roofing service life and prevents minor issues from escalating into expensive repairs. A proactive approach to bay roofing care yields significant long-term benefits.
Recommended Inspection Schedule
Annual inspections should occur twice yearly, ideally in spring and fall. These examinations focus on:
- Flashing condition at all transition points, looking for separation, corrosion, or damage
- Sealant integrity around penetrations and at critical junctions
- Roofing material condition including shingle tabs, membrane seams, or metal panel fasteners
- Drainage performance ensuring water flows properly without ponding
- Interior indicators such as staining, dampness, or deterioration visible from inside
After severe weather events, additional inspections help identify damage before it causes secondary problems. High winds can lift roofing materials or damage flashing, while heavy snow loads may stress structural components.
Maintenance Tasks That Extend Service Life
Beyond inspections, routine maintenance preserves bay roofing integrity:
- Clean gutters and drainage to prevent water backup onto the bay roof
- Remove debris that accumulates in roof valleys or against the head wall
- Trim overhanging branches that scrape roofing materials or drop leaves
- Re-seal penetrations as caulking ages and loses adhesion
- Address minor repairs promptly before they expand into major problems
Professional maintenance every 3-5 years provides deeper evaluation than homeowner inspections can achieve. Experienced roofing contractors identify subtle warning signs that non-professionals might miss, potentially preventing catastrophic failures.
Regional Considerations for Bay Roofing in California
California's diverse climate zones create specific challenges and opportunities for bay roofing applications. Understanding regional factors helps optimize material selection and installation techniques for Los Angeles and surrounding areas.
Climate-Specific Factors
Southern California's Mediterranean climate features dry summers, mild winters, and occasional heavy rainfall. Bay roofing in this region must handle:
Thermal cycling between hot days and cool nights causes roofing materials to expand and contract. Metal flashings require proper fastening that accommodates movement without creating stress points. Flexible sealants and self-adhered membranes perform better than rigid materials in these conditions.
UV exposure in sunny climates accelerates material degradation. Asphalt-based products benefit from granule coatings that reflect solar radiation. Metal roofing with reflective coatings reduces heat transfer into the bay window area while extending material life.
Seismic considerations unique to California require special attention to how bay structures attach to the main building. Bay roofing systems must flex with the building during seismic events without compromising waterproofing. Flexible flashing materials and properly detailed connections prevent earthquake-induced failures.
Seasonal rainfall patterns concentrate water exposure into specific months. While total annual rainfall may be modest, individual storm events can be intense. Bay roofing drainage systems must handle peak flows without overflow or backup.
Code Compliance and Permit Requirements
Los Angeles building codes establish specific requirements for bay window construction and roofing. Professional contractors navigate these regulations to ensure compliant installations that pass inspection:
- Fire ratings appropriate for the building's location and surroundings
- Structural calculations verifying adequate support for roof loads
- Energy compliance meeting California's Title 24 requirements
- Water management following modern drainage and flashing standards
Permit requirements vary by project scope. New bay window installations require comprehensive permits covering structural, roofing, and potentially electrical work if lighting is added. Bay roofing replacement on existing structures may qualify for simplified permitting depending on the extent of work.
Cost Factors and Budget Planning
Bay roofing projects involve several cost variables that influence total investment. Understanding these factors helps homeowners develop realistic budgets and make informed decisions about materials and contractors.
Primary Cost Drivers
Labor complexity represents the largest cost component for bay roofing. The detailed flashing work, careful material integration, and skilled craftsmanship required command premium pricing compared to simple roof sections. Expect bay roofing labor costs to run 40-60% higher per square foot than standard roof areas.
Material selection significantly impacts project costs:
- Economy range: Asphalt shingles with basic flashing ($15-25 per square foot installed)
- Mid-range: Premium shingles or modified bitumen with enhanced flashing ($25-40 per square foot)
- Premium: Metal roofing or specialized membranes with comprehensive warranty ($40-70+ per square foot)
Project scope affects pricing through economies of scale. Bay roofing replacement done in conjunction with a complete roof replacement typically costs less per square foot than an isolated bay roof project requiring full mobilization for a small area.
Accessibility challenges increase costs when bay windows are located over difficult terrain, require extensive staging, or sit at significant heights. Two-story bay windows cost more to service than ground-floor installations due to safety equipment and time requirements.
Value Considerations Beyond Initial Cost
While upfront pricing matters, long-term value depends on several factors:
- Material longevity determines replacement frequency
- Warranty coverage protects against premature failures
- Energy performance affects heating and cooling costs
- Maintenance requirements create ongoing expenses
- Contractor expertise prevents costly callbacks and repairs
Return on investment for bay roofing projects comes primarily through home protection rather than resale value. However, well-maintained bay windows with sound roofing enhance curb appeal and avoid the significant buyer concerns that water-damaged bays create during home sales.
Choosing Professional Bay Roofing Contractors
Selecting qualified contractors makes the difference between successful bay roofing projects and problematic installations that require premature replacement. Several criteria help identify contractors with the expertise these specialized projects demand.
Essential Contractor Qualifications
Licensing and insurance form the baseline requirements. California contractors must hold appropriate state licenses (C-39 for roofing) and carry both liability insurance and workers' compensation coverage. Verify these credentials directly with the California Contractors State License Board rather than relying solely on contractor representations.
Bay roofing experience specifically matters more than general roofing credentials. Ask potential contractors about:
- The number of bay roofing projects completed in the past year
- Their approach to complex flashing details
- Familiarity with different bay roof configurations
- Experience with your specific roofing material
- Understanding of building science principles related to water management
References and portfolio provide insight into work quality and customer satisfaction. Request contact information for recent bay roofing clients and actually call them. Ask about communication, cleanup, problem-solving, and whether they would hire the contractor again.
Red Flags to Avoid
Certain contractor behaviors signal potential problems:
- Pressure tactics demanding immediate decisions or deposits
- Unusually low bids that seem too good to be true
- Cash-only payment requests without proper documentation
- Resistance to permits or building department involvement
- Vague warranties without written details
Written contracts should detail every aspect of the bay roofing project including materials by manufacturer and product line, scope of work, payment schedule, timeline, warranty terms, and cleanup procedures. Never proceed with verbal agreements for significant roofing work.
Proper bay roofing requires specialized knowledge, quality materials, and meticulous installation techniques that protect your home for decades. Whether you're addressing existing problems or planning new construction, understanding these principles ensures successful outcomes. For expert bay roofing services in Los Angeles and surrounding areas, Proof Your Roof brings the experience and commitment to quality that these challenging projects demand, delivering installations that stand the test of time.